> ## Documentation Index
> Fetch the complete documentation index at: https://docs.state.space/llms.txt
> Use this file to discover all available pages before exploring further.
# ERC20: End-to-End Testing of transferFrom
> Tutorial on end-to-end testing of transferFrom user flow
**Objectives:**
Install the CLI and setup environment\
Successfully upload your first smart contract to Workbench.\
Visually design an end-to-end test scenario.\
Generate the state space and a test suite.\
Analyze and validate contract behavior.\
Export a test case to Hardhat and Foundry.
Create an account [here](https://app.state.space/sign-up).
### Install State Space CLI:
```bash theme={null}
brew install state-space/state-space/cli
```
### Download the ERC20 example from our Github repo
For this tutorial we'll use an unmodified ERC20 project from OpenZeppelin.
Clone the repo based on your framework preference.
```bash Foundry theme={null}
git clone https://github.com/state-space/public-examples.git && cd public-examples/OpenZeppelinERC20_Foundry/
```
```bash Hardhat theme={null}
git clone https://github.com/state-space/public-examples.git && cd public-examples/OpenZeppelinERC20_Hardhat/
```
If you are using your own project, make sure your code successfully compiles.
***
### Initialize project
Run the `init` command from the main folder of your Foundry or Hardhat project to create the `state-space.toml` config file.
```bash theme={null}
state-space init
```
It should look like this:
```toml state-space.toml [expandable] theme={null}
# Sets the name of the project.
#
# The project is created if it does not already exist.
project = "Project MyToken"
# If using State Space in a team, specify the team identifier.
# By default, your personal account will be used.
team = "my-team"
# Sets the primary framework to use.
#
# When setting a framework, contract sources and solc settings are
# automatically used when pushing code to State Space.
#
# Optional. Supports "foundry" or "hardhat".
framework = "hardhat"
# Creates a new Workbench project
workbench.new = "MyToken"
# Specify paths to solc json output files.
# If using a framework, this usually isn't necessary.
# artifacts = []
# Defines a deployment
#
# Deployments are a set of concrete transactions and accounts.
# They are used as initial states when exploring your state space.
#
# Deployments are recorded by running a script against a local EVM.
# Deployments are currently only supported when using a framework.
# [deployment.Main]
# Command is a list of strings representing the command to run when
# recording this deployment. Ensure that your RPC endpoint points to
# localhost:8545.
# command = ["forge", "script", ...]
# When using Foundry scripts, the scripts property may be used as a
# shorthand alternative to the command property.
# The RPC url does not need to be specified when using this form.
# scripts = [
# "name of or path to Foundry script",
# ]
# When using Hardhat's Ignition, the modules property may be used as a
# shorthand alternative to the command property.
# The RPC url does not need to be specified when using this form.
# modules = [
# "path to Ignition module",
# ]
# Specify the number of externally owned accounts (wallets) to use
# in this deployment
# accounts = 3
```
### Update configuration
Add the `workbench.new` property to automatically create a Workbench project upon submission. Your settings should like this:
```toml Foundry theme={null}
# state-space.toml
project="MyToken"
framework="foundry"
workbench.new="MyToken"
```
```toml Hardhat theme={null}
# state-space.toml
project="MyToken"
framework="hardhat"
workbench.new="MyToken"
```
### Deploy to State Space
```bash theme={null}
# execute command in terminal
state-space push
```
Authenticate using the same credentials you created in Step 1. After you authenticate, you will see your project appear in the browser Workbench dasboard.
***
Use the browser to [login](https://state.space/me) to State Space, and select the `My Contract` Workbench project we just uploaded.
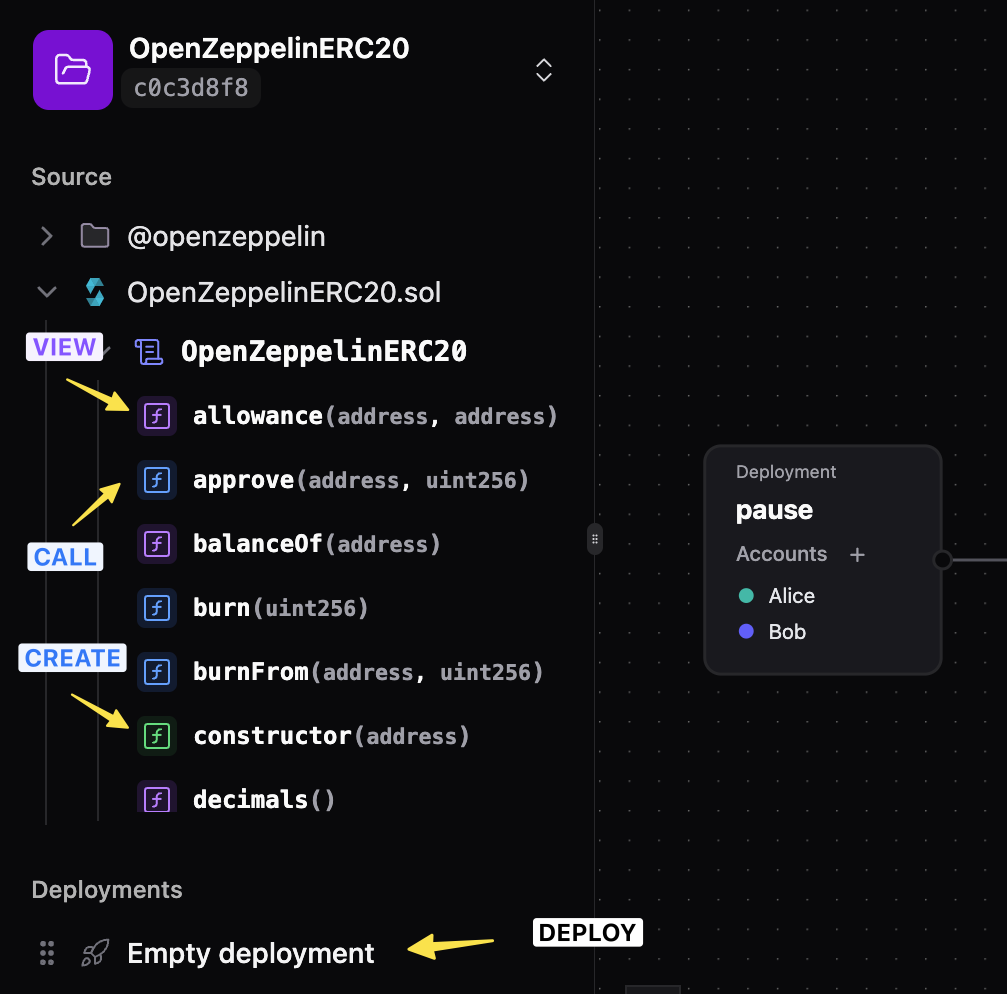
Expand the folder tree to view your code as visual interactive components.
Each component represents an externally visible function, with the following identifiers:
Blue = `CALL` - function call\
Purple = `VIEW` - view function\
Green = `CREATE` - constructor\
Gray = `DEPLOY` - deployment script
 ***
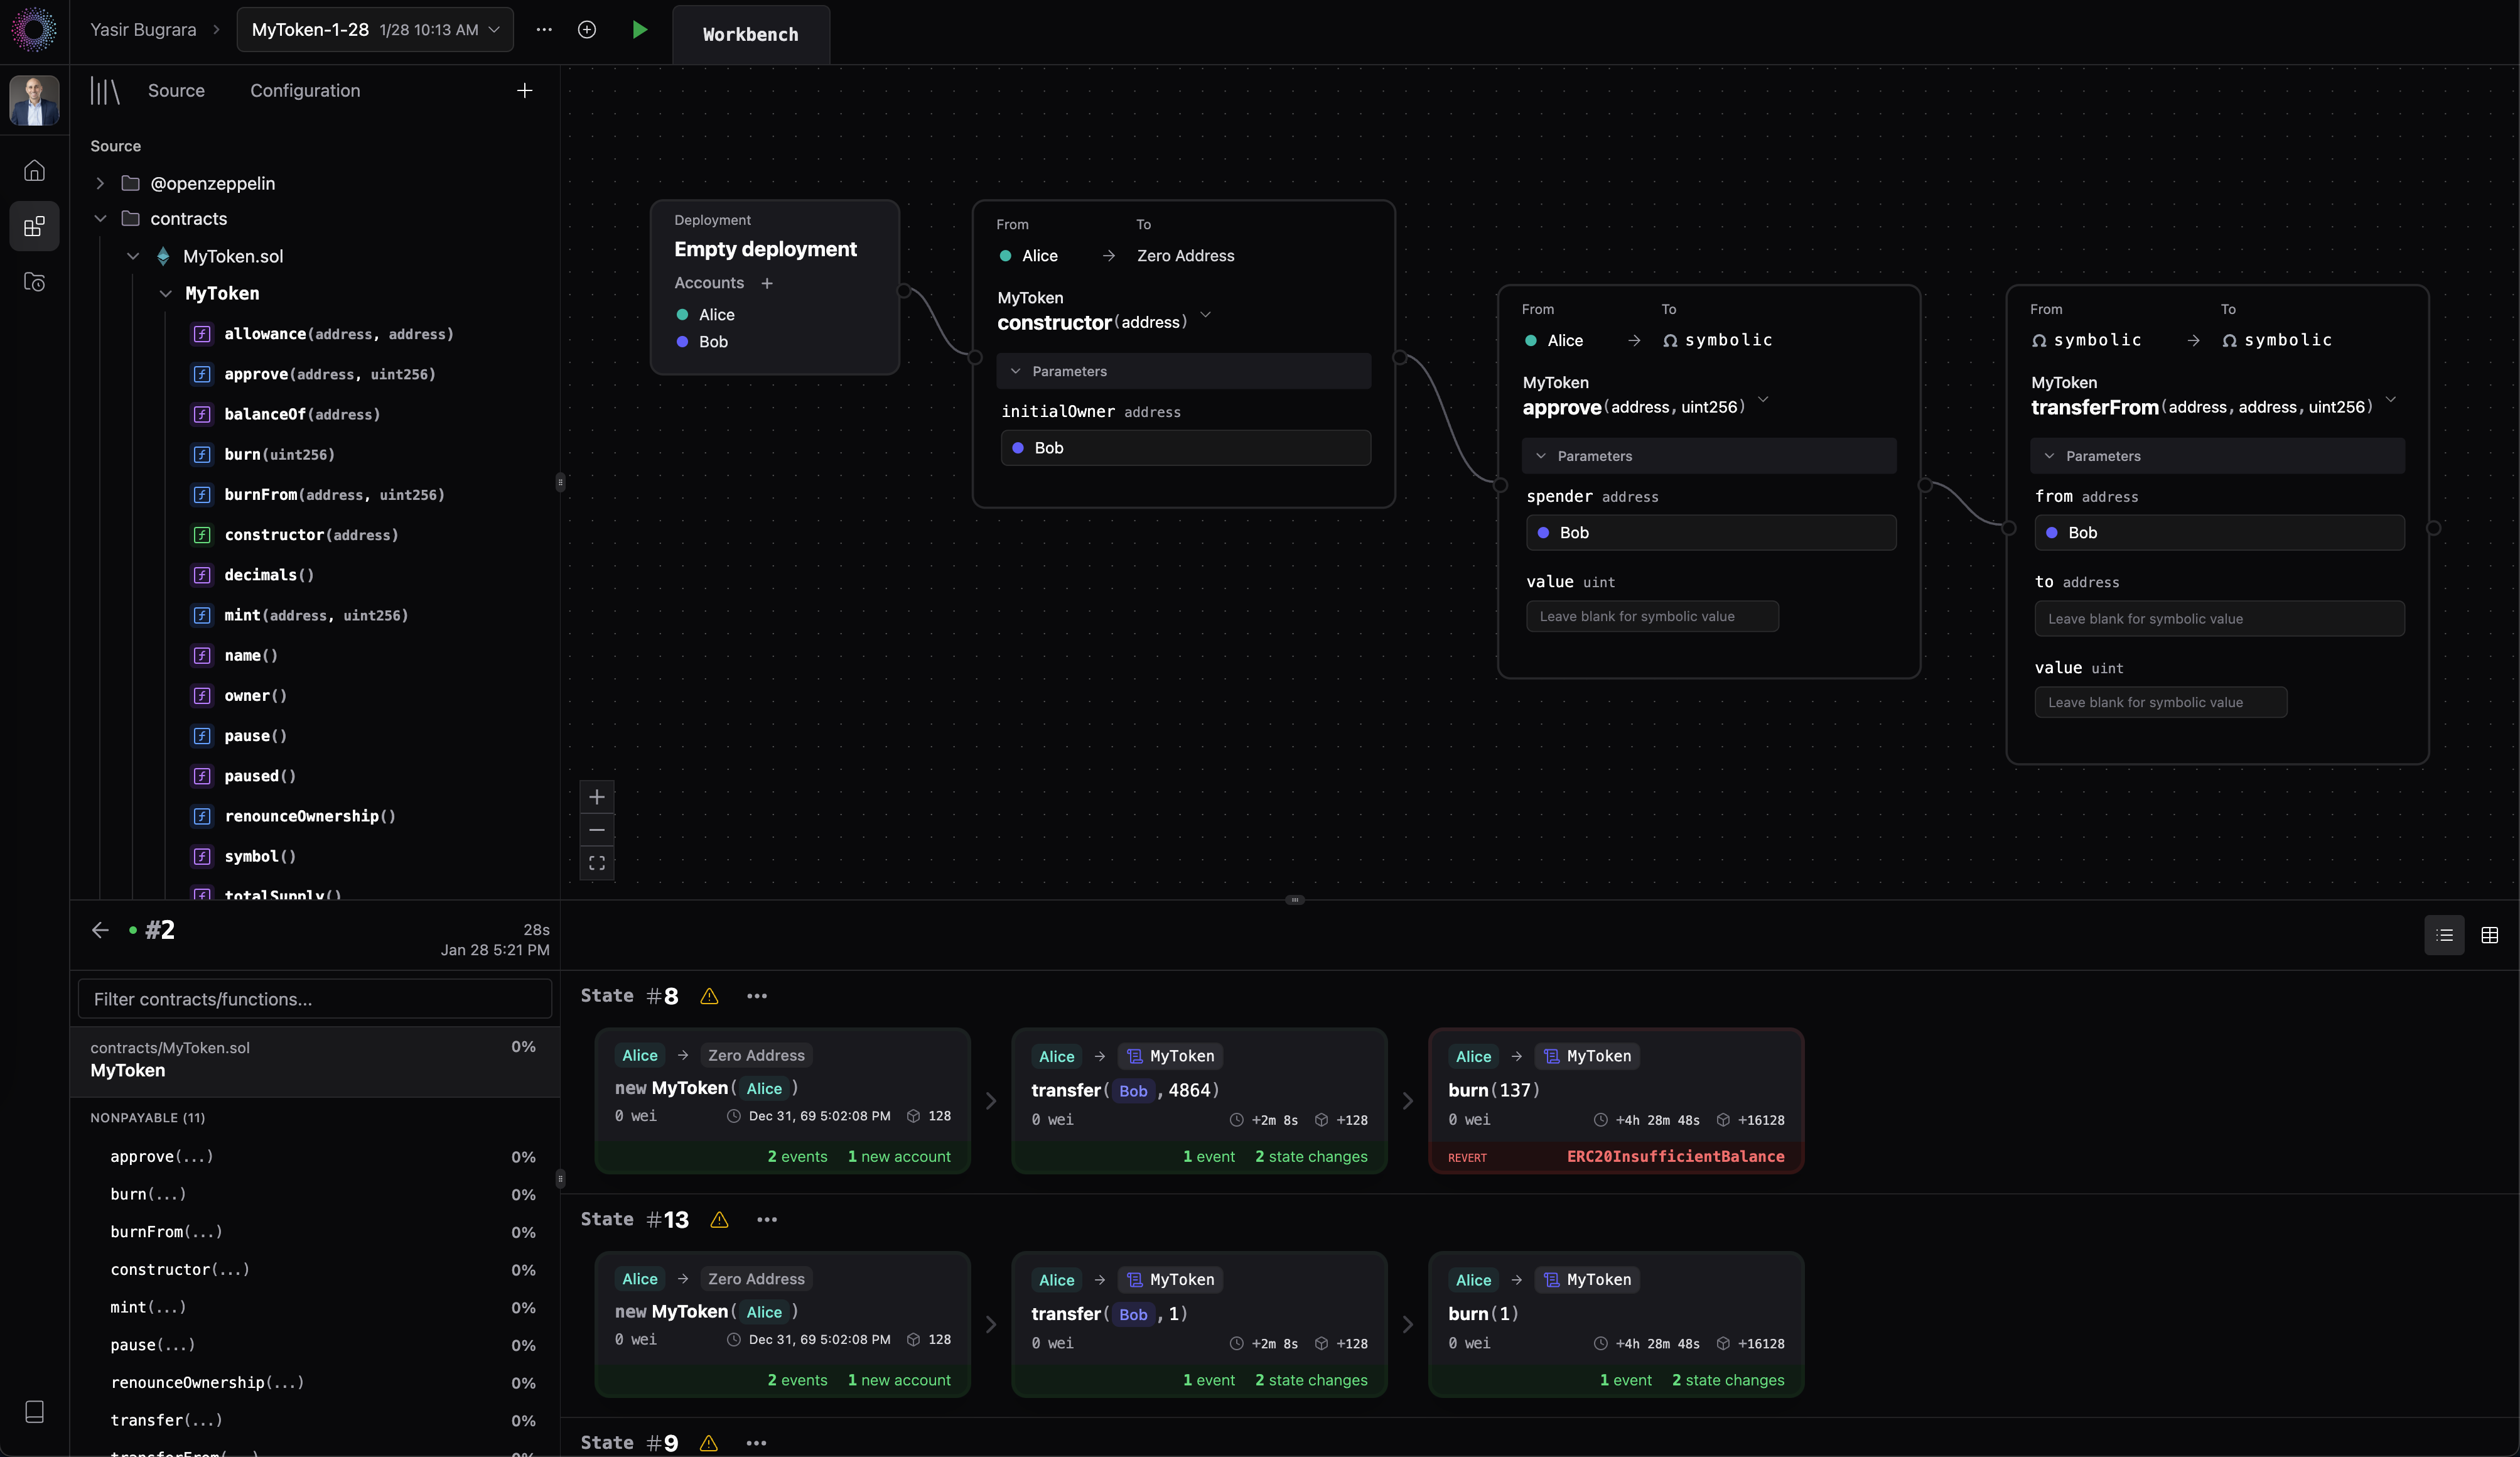
Build an end-to-end test scenario for the [`transferFrom(...)`](https://eips.ethereum.org/EIPS/eip-20#transferfrom) flow using the following sequence of transactions:
`Deployment` → `constructor(...)` → `approve(...)` → `transferFrom(...)`
### Configure a basic deployment
Since our project did not use a custom deployment script, we can use the provided deployment template to quickly setup a few EOAs.
1. From the bottom of the folder tree, drag an `Empty Deployment` component to the canvas and rename it to "ERC20 Deployment".
2. Reduce the EOA count to two (2) by deleting `Claire` (keeping `Alice` and `Bob`). You can add more EOA accounts by selecting the `+` icon from inside the node.
To leverage custom deployment scripts as part of your testing flow, see the [CLI reference](/docs/cli/reference/#configuration-settings-for-state-space-toml) or [contact us](mail:contact@state.space) for help.
### Construct the transaction sequence
3. Drag the `constructor`, `approve`, and `transferFrom` function calls onto the canvas and connect them in sequence, mimicing the end-to-end user flow.
It should look like this:
***
Build an end-to-end test scenario for the [`transferFrom(...)`](https://eips.ethereum.org/EIPS/eip-20#transferfrom) flow using the following sequence of transactions:
`Deployment` → `constructor(...)` → `approve(...)` → `transferFrom(...)`
### Configure a basic deployment
Since our project did not use a custom deployment script, we can use the provided deployment template to quickly setup a few EOAs.
1. From the bottom of the folder tree, drag an `Empty Deployment` component to the canvas and rename it to "ERC20 Deployment".
2. Reduce the EOA count to two (2) by deleting `Claire` (keeping `Alice` and `Bob`). You can add more EOA accounts by selecting the `+` icon from inside the node.
To leverage custom deployment scripts as part of your testing flow, see the [CLI reference](/docs/cli/reference/#configuration-settings-for-state-space-toml) or [contact us](mail:contact@state.space) for help.
### Construct the transaction sequence
3. Drag the `constructor`, `approve`, and `transferFrom` function calls onto the canvas and connect them in sequence, mimicing the end-to-end user flow.
It should look like this:
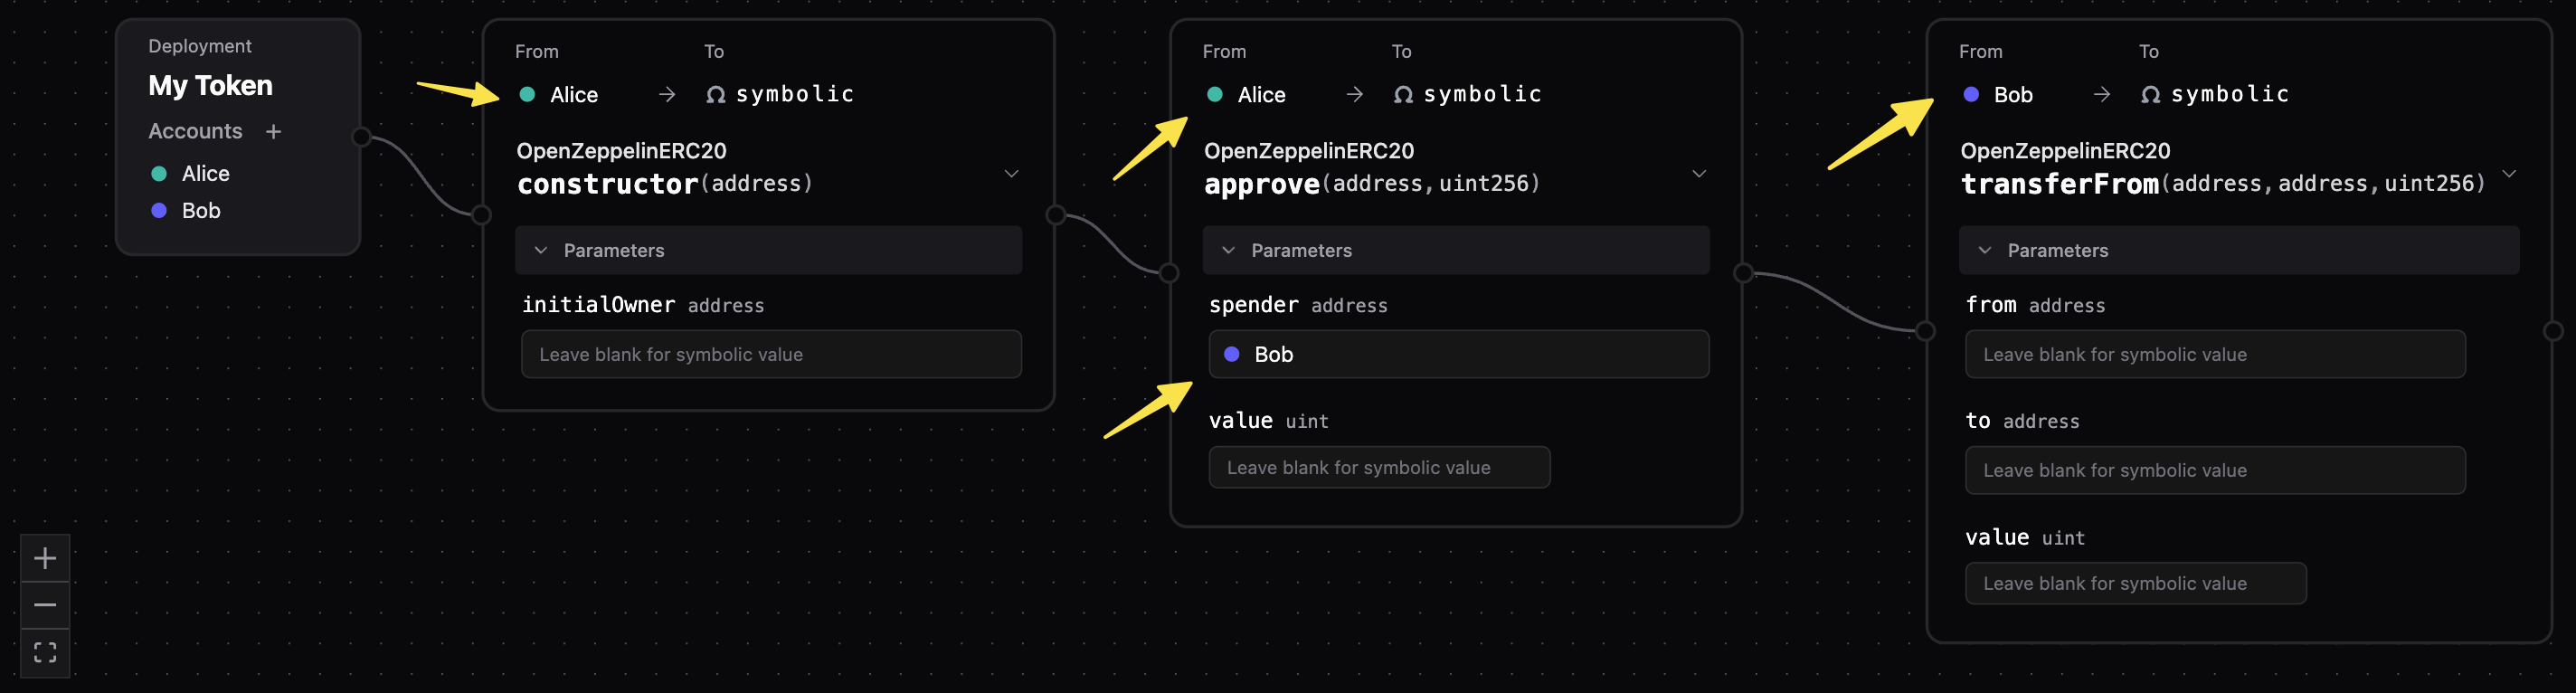
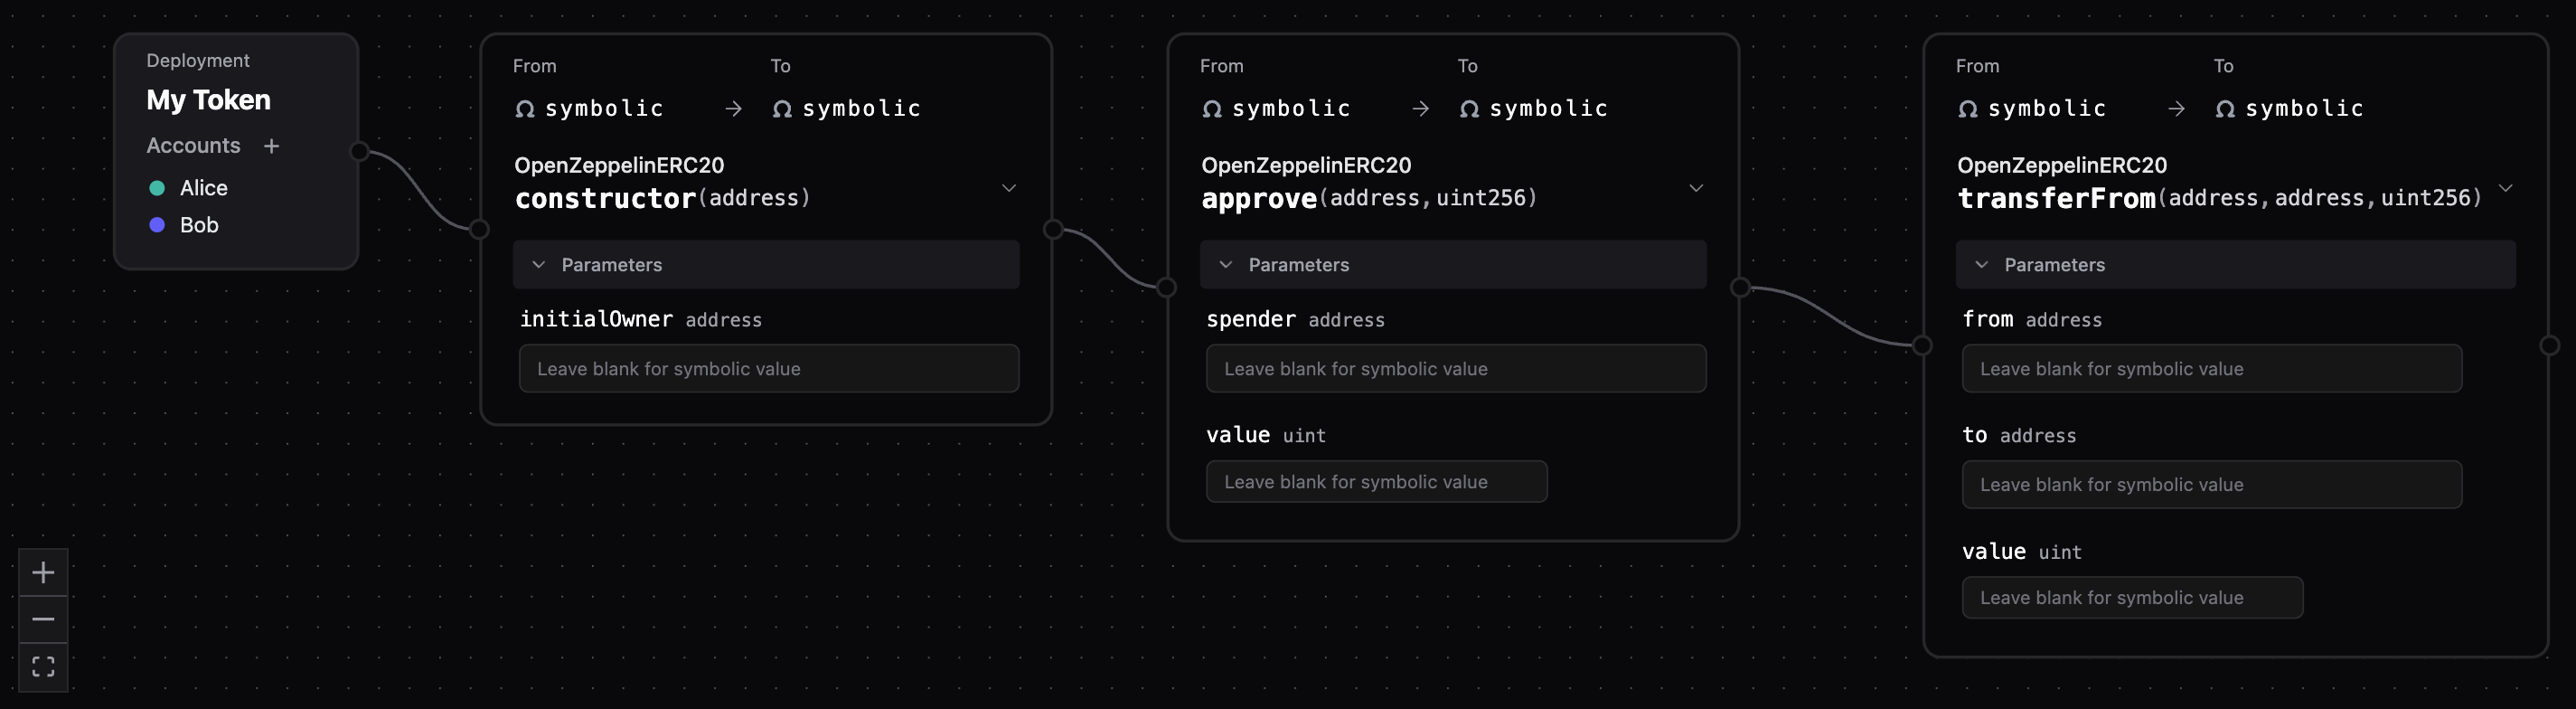 ### Configure symbolic parameters
Transaction and function call parameters can be set to behave as symbolic values or concrete inputs.
When set to symbolic, State Space will automatically calculate the possible unique input values that will lead to an undiscovered path.
[Learn more](/docs/overview/concepts#structured-dynamic-inputs) about how [structured dynamic inputs](/docs/overview/concepts#structured-dynamic-inputs) are generated.
4. Update the parameters so that:
* `Alice` deploys the contract
* `Alice` approves `Bob` as the `_spender`
* `Bob` calls `transferFrom(...)`
Leave all other fields blank to act symbolically.
It should look like this:
### Configure symbolic parameters
Transaction and function call parameters can be set to behave as symbolic values or concrete inputs.
When set to symbolic, State Space will automatically calculate the possible unique input values that will lead to an undiscovered path.
[Learn more](/docs/overview/concepts#structured-dynamic-inputs) about how [structured dynamic inputs](/docs/overview/concepts#structured-dynamic-inputs) are generated.
4. Update the parameters so that:
* `Alice` deploys the contract
* `Alice` approves `Bob` as the `_spender`
* `Bob` calls `transferFrom(...)`
Leave all other fields blank to act symbolically.
It should look like this:
 ***
Select the icon to start.
Discovered execution paths will appear dynamically during execution. Overall coverage metrics will be displayed once the state space exploration is completed.
[Contact us](contact@state.space) if you experience any issues.
Upon completion, you should see a total 39 test cases (execution paths) with a 37% health score.
Health scores are a function of line, branch, and functional coverage metrics.
For a more in-depth coverage analysis, open the coverage view in a new tab by selecting the run number under "Run History". Select your contract on the left navigation menu and view the covered lines under the `source` tab.
Feel free to experiement with different parameter settings and sequences to analyze behavior and maximize coverage.
State Space explosion can easily occur with fully symbolic parameters and long sequences. We recommend constraining your analysis to your test objective to get meaningful, digestable results. If you accidentally encounter this, right click the active run (in Run History) to cancel the exploration run.
***
Scroll through and locate the test case where:
* `Bob` approves `Aice` to spend an allowance of `uint MAX` tokens, **AND**
* `Alice` successfully transfers 1 token from `Bob's` account.
It should look like this:
***
Select the icon to start.
Discovered execution paths will appear dynamically during execution. Overall coverage metrics will be displayed once the state space exploration is completed.
[Contact us](contact@state.space) if you experience any issues.
Upon completion, you should see a total 39 test cases (execution paths) with a 37% health score.
Health scores are a function of line, branch, and functional coverage metrics.
For a more in-depth coverage analysis, open the coverage view in a new tab by selecting the run number under "Run History". Select your contract on the left navigation menu and view the covered lines under the `source` tab.
Feel free to experiement with different parameter settings and sequences to analyze behavior and maximize coverage.
State Space explosion can easily occur with fully symbolic parameters and long sequences. We recommend constraining your analysis to your test objective to get meaningful, digestable results. If you accidentally encounter this, right click the active run (in Run History) to cancel the exploration run.
***
Scroll through and locate the test case where:
* `Bob` approves `Aice` to spend an allowance of `uint MAX` tokens, **AND**
* `Alice` successfully transfers 1 token from `Bob's` account.
It should look like this:
 Transaction highlighted with green indicates a successful transaction occurred. Transactions ending with a red highlight indicate a reverting path.
Here is an example of a reverted execution path (expected behavior) where State Space autonomously tested a transferFrom amount greater than the `umax` spending allowance:
Transaction highlighted with green indicates a successful transaction occurred. Transactions ending with a red highlight indicate a reverting path.
Here is an example of a reverted execution path (expected behavior) where State Space autonomously tested a transferFrom amount greater than the `umax` spending allowance:
 ### Analyze the state behavior:
1. From the results, click a function call in the transaction sequence to analyze contract values, state changes, balances, and emitted events.
2. Review all state values and changes for correctness.
* Green highlighted text indicates new state value
* Red → Green format indicates a state change (prior → new state)
### Validate states
3. Mark states as "Valid" by clicking through the shield icon:
* Green shield: Valid state
* Red shield: Invalid state
* Grey shield: Not reviewed
4. Each validation is tracked in the `History` tab.
5. Multiple reviewers with can collaborate validating state values.
***
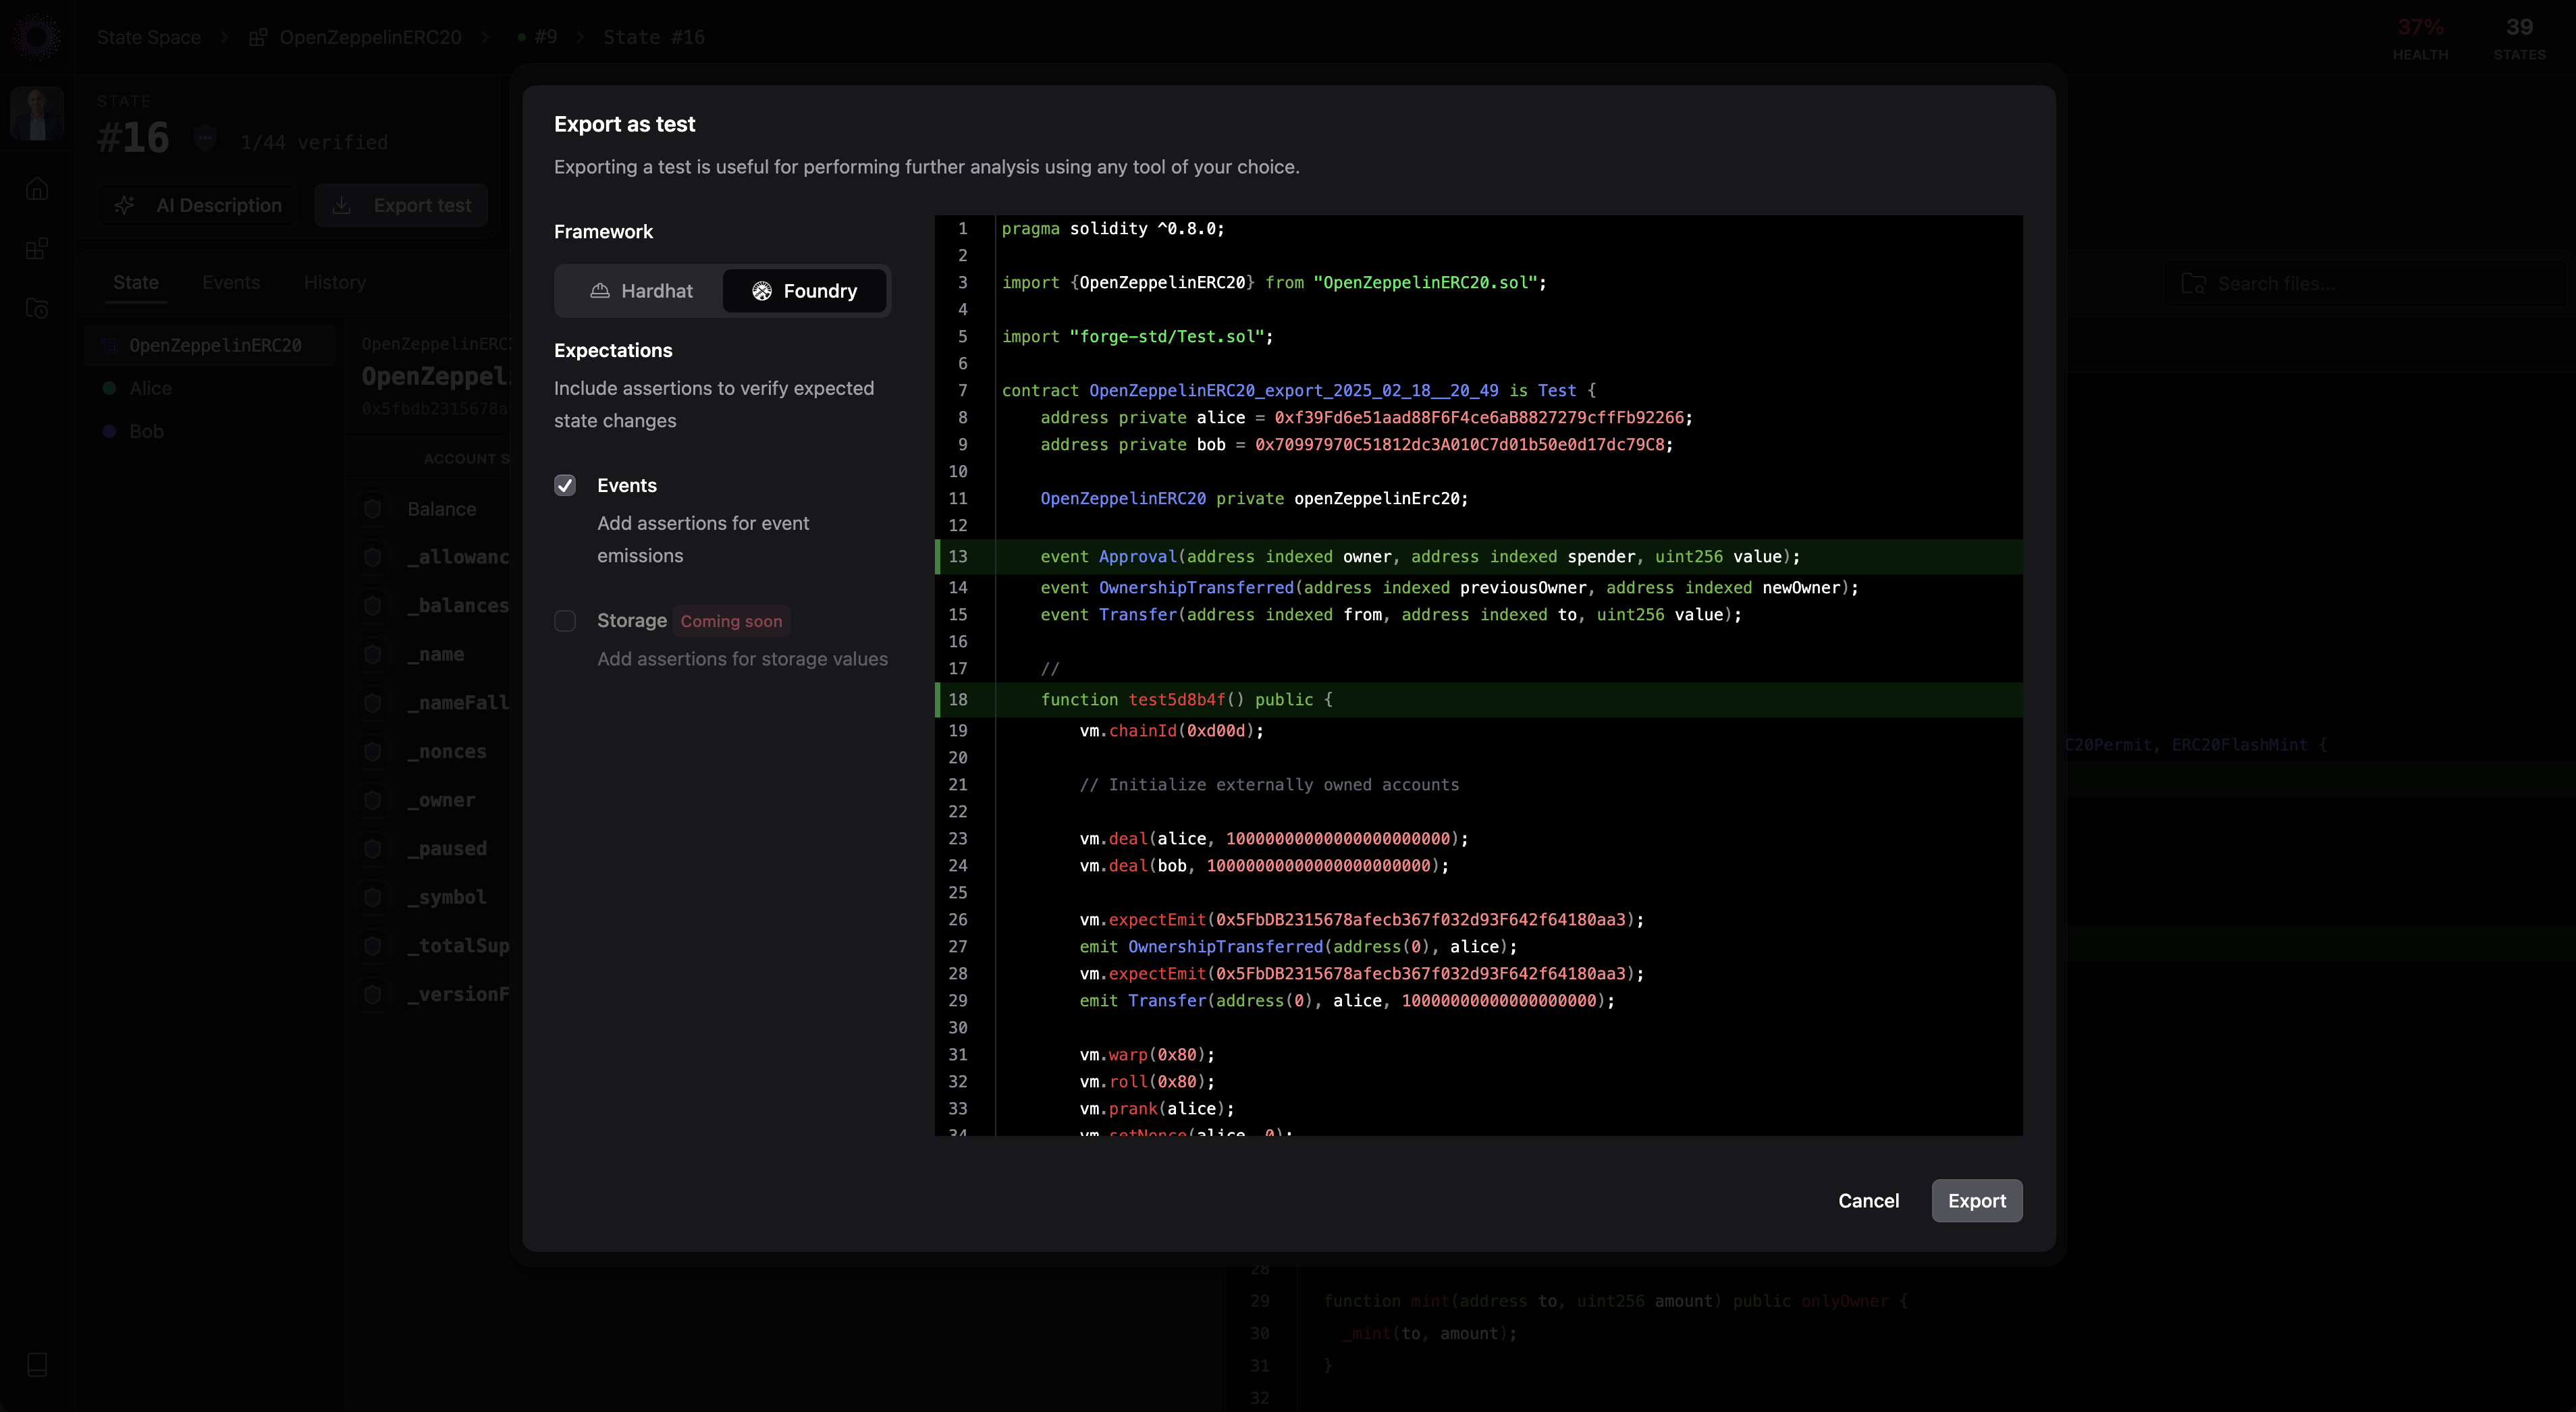
Select the "Export Test" button, and choose your framework (Hardhat or Foundry) to copy or download the test.
Check the "Events" box to include assertions for event emissions.
### Analyze the state behavior:
1. From the results, click a function call in the transaction sequence to analyze contract values, state changes, balances, and emitted events.
2. Review all state values and changes for correctness.
* Green highlighted text indicates new state value
* Red → Green format indicates a state change (prior → new state)
### Validate states
3. Mark states as "Valid" by clicking through the shield icon:
* Green shield: Valid state
* Red shield: Invalid state
* Grey shield: Not reviewed
4. Each validation is tracked in the `History` tab.
5. Multiple reviewers with can collaborate validating state values.
***
Select the "Export Test" button, and choose your framework (Hardhat or Foundry) to copy or download the test.
Check the "Events" box to include assertions for event emissions.